Debian 13 und MyBookLive
15.08.2025 - Lesezeit: 2 Minuten

Seit vielen Jahren nutze ich meine MyBookLive zur täglichen Datensicherung. Der Support wurde von WD im Jahr 2016 eingestellt. Deshalb ist die ssh Schnittstelle hoffungslos veraltet, Bis Debian 12 konnte SSH mit der Option +ssh-dss noch für das veraltete Protokoll genutzt werden.
#Host mybooklive
  Hostname mybooklive.fritz.box
  HostKeyAlgorithms +ssh-dss
  User wnf
Da ssh nicht funktioniert funktioniert auch rsync nicht mehr.
Als Ersatz nutze ich nun rclone.
Mit
rclone configwird die ftp-Verbindung für rclone definiert. Danach kann rclone benutzt werden
eclude="--exclude-from=/home/wnf/bin/wnfrsync2mybooklive_exclude_list.txt"
rclone copy /home/wnf/Musik/ mybooklive:/shares/wnf/Musik/ $exclude
Da ich mich immer auf meinem MyBookLive per ssh einloggen konnte habe ich nach einem Rechner gesucht denoch ein veraltetes ssh besitzt:

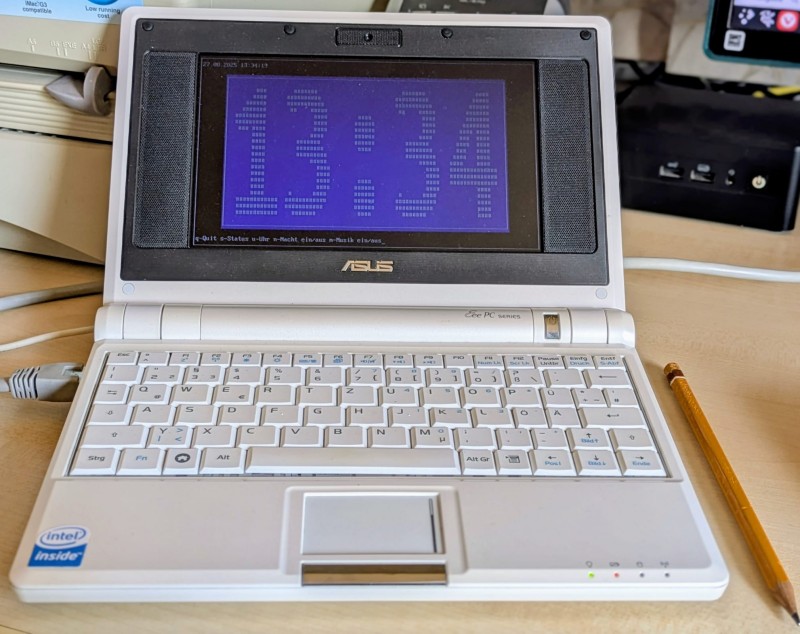
Dieser Rechner von 2008 läuft noch mit einer ssh Version
$ ssh -V
OpenSSH_6.6.1p1 Ubuntu-2ubuntu2, OpenSSL 1.0.1f 6 Jan 2014
und mit
ssh root@mybooklive.fritz.boxkann ich mich wieder einloggen.
Auf dem MyBookLive läuft ein ssh
# ssh -V
OpenSSH_5.1p1 Debian-5, OpenSSL 0.9.8zf 19 Mar 2015Fehler beim ssh-Zugriff auf WD-MyBookLive
09.03.2023 - Lesezeit: ~1 Minute
$ ssh mybooklive
Unable to negotiate with 192.168.80.10 port 22: no matching host key type found. Their offer: ssh-rsa,ssh-dss
Wie hier beschrieben wird muss in der ~/.ssh/config die Verbindungsart festgelegt werden
Host mybooklive
   Hostname mybooklive
   HostKeyAlgorithms +ssh-rsa
User wnfKein ssh-login auf MyBookLive mehr [gelöst]
03.05.2014 - Lesezeit: 6 Minuten
In meinem Backup-Script sichere ich seit langer Zeit meine Daten auf mybooklive.fritz.box (das ist mein NAS). Von einem Tag auf den anderen funktioniert das Script nicht mehr.
Kurzfassung der Lösung
- in der Datei /etc/ssh/sshd_config auf MyBookLive fehlten die AllowUsers
AllowUsers root wnf bine - Das Home-Verzeichnis des Users wnf gehörte nicht mehr wnf sondern nobody
# chown wnf:share /shares/wnf
Woran kann das liegen?
Der Ping funktioniert
$ ping mybooklive.fritz.box
PING mybooklive.fritz.box (192.168.1.6) 56(84) bytes of data.
64 bytes from mybooklive (192.168.1.6): icmp_req=1 ttl=64 time=0.197 ms
$ ping mybooklive.local
PING mybooklive.local (192.168.1.6) 56(84) bytes of data.
64 bytes from mybooklive (192.168.1.6): icmp_req=1 ttl=64 time=0.161 ms
$ ping mybooklive
PING mybooklive (192.168.1.6) 56(84) bytes of data.
Jetzt versuche ich mich per ssh auf MyBookLive anzumelden.
$ ssh root@mybooklive.fritz.box
@@@@@@@@@@@@@@@@@@@@@@@@@@@@@@@@@@@@@@@@@@@@@@@@@@@@@@@@@@@
@    WARNING: REMOTE HOST IDENTIFICATION HAS CHANGED!     @
@@@@@@@@@@@@@@@@@@@@@@@@@@@@@@@@@@@@@@@@@@@@@@@@@@@@@@@@@@@
IT IS POSSIBLE THAT SOMEONE IS DOING SOMETHING NASTY!
Someone could be eavesdropping on you right now (man-in-the-middle attack)!
It is also possible that a host key has just been changed.
The fingerprint for the RSA key sent by the remote host is
37:75:0e:15:12:78:30:55:11:fb:9b:aa:21:b4:df:05.
Please contact your system administrator.
Add correct host key in /home/wnf/.ssh/known_hosts to get rid of this message.
Offending RSA key in /home/wnf/.ssh/known_hosts:7
  remove with: ssh-keygen -f "/home/wnf/.ssh/known_hosts" -R mybooklive.fritz.box
RSA host key for mybooklive.fritz.box has changed and you have requested strict checking.
Host key verification failed.
Ja, wenn der ssh-Zugriff auf MyBookLive nicht mehr funktioniert, dann kann die Datensicherung natürlich auch nicht mehr funktionieren.
Also wie angegeben den alten Schlüssel entfernen:
$ ssh-keygen -f "/home/wnf/.ssh/known_hosts" -R mybooklive.fritz.box
/home/wnf/.ssh/known_hosts updated.
Original contents retained as /home/wnf/.ssh/known_hosts.old
Und dann beim Anmelden per ssh wieder herstellen:
wnf@c2012:~$ ssh root@mybooklive.fritz.box
The authenticity of host 'mybooklive.fritz.box (192.168.1.6)' can't be established.
RSA key fingerprint is 37:75:0e:15:12:78:30:55:11:fb:9b:aa:21:b4:df:05.
Are you sure you want to continue connecting (yes/no)? yes
Warning: Permanently added 'mybooklive.fritz.box' (RSA) to the list of known hosts.
Warning: the RSA host key for 'mybooklive.fritz.box' differs from the key for the IP address '192.168.1.6'
Offending key for IP in /home/wnf/.ssh/known_hosts:4
Are you sure you want to continue connecting (yes/no)? yes
root@mybooklive.fritz.box's password:
Als normaler User kann ich mich immer noch nicht anmelden. Bei der Kontrolle der Datei /etc/ssh/sshd_config auf MyBookLive fiel mir auf, dass in der Zeile
AllowUsers rootdie anderen Benutzer fehlten
AllowUsers root wnf bineaußerdem
#AuthorizedKeysFile %h/.ssh/authorized_keysändern in
AuthorizedKeysFile %h/.ssh/authorized_keysAlso die Datei bearbeiten und vom sshd neu einlesen lassen:
# nano /etc/ssh/sshd_config
MyBookLive:/# /etc/init.d/ssh reload
Und es funktioniert immer noch kein Einloggen ohne Passwort.
Deshalb als root auf mybooklive einloggen und die Meldungen aus /var/log/sshd.log anzeigen:
# egrep -i 'ssh.*wnf' /var/log/sshd.log
May  3 15:02:59 MyBookLive sshd[7320]: Authentication refused: bad ownership or modes for directory /shares/wnf
May  3 15:02:59 MyBookLive sshd[7320]: Authentication refused: bad ownership or modes for directory /shares/wnf
Kontrolle wer das Homeverzeichnis besitzt:
# ls -l /shares/
drwxr-xr-x 17 nobody share 65536 Aug 26  2013 wnf
# chown wnf:share /shares/wnf
# ls -l /shares/
drwxr-xr-x 17 wnf share 65536 Aug 26 2013 wnfUnd siehe da es funktioniert der passwort-lose zugriff auf mein NAS MyBookLive wieder.
Neuer Rechner neues Glück.
Das anmelden per ssh funktioniert nur per Passwort-Authentifizierung.
$ ssh-copy-id -i ~/.ssh/id_rsa.pub bine@mybooklive
Warning: the RSA host key for 'mybooklive' differs from the key for the IP address '192.168.1.6'
Offending key for IP in /home/bine/.ssh/known_hosts:3
Matching host key in /home/bine/.ssh/known_hosts:5
Are you sure you want to continue connecting (yes/no)? yes
bine@mybooklive's password:
sh: line 2: .ssh/authorized_keys: Keine Berechtigung
Login auf MyBookLive und dort die .ssh/authorized_keys löschen
rm .ssh/authorized_keyswieder ausloggen und den Schlüssel erneut übertragen:
$ ssh-copy-id -i ~/.ssh/id_rsa.pub bine@mybooklive
/usr/bin/ssh-copy-id: INFO: attempting to log in with the new key(s), to filter out any that are already installed
/usr/bin/ssh-copy-id: INFO: 1 key(s) remain to be installed -- if you are prompted now it is to install the new keys
bine@mybooklive's password:

Number of key(s) added: 1

Now try logging into the machine, with:   "ssh 'bine@mybooklive'"
and check to make sure that only the key(s) you wanted were added.

$ ssh mybooklivessh Zugriff auf WD My Book Live über Public Keys (2)
26.08.2013 - Lesezeit: ~1 Minute
Die [hier beschriebene Lösung](http://www.wlsoft.de/?q=node/134 funktioniert nur für einen Nutzer. Da jetzt jedoch ein zusätzlicher Nutzer seine Daten auf MyBookLive ablegen soll, gab es Probleme. )
In der ~/.ssh/authorized_keys wurde mit dem Befehl
$ ssh-copy-id -i ~/.ssh/id_rsa.pub wnf@mybooklive.localimmer nur ein Schlüssel abgelegt.
Auf der MyBookLive haben alle dort angelegten Nutzer das gemeinsame Homeverzeichnis /shares.
Vielleicht geht es auch anders, aber ich habe das Problem dadurch gelöst, dass ich für jeden Nutzer ein eigenes Verzeichnis angelegt und das Home-Verzeichnis umgewiesen habe.
$ ssh root@mybooklive.fritz.box
root@mybooklive.fritz.box's password:
MyBookLive:~# mkdir /shares/wnf
MyBookLive:~# chown wnf:share /shares/wnf
MyBookLive:~# mkdir /shares/bine
MyBookLive:~# chown bine:share /shares/bine
MyBookLive:~# usermod -d /shares/wnf wnf
MyBookLive:~# usermod -d /shares/bine bine
MyBookLive:~# exitssh Zugriff auf WD My Book Live über Public Keys
01.03.2012 - Lesezeit: 2 Minuten
Literatur
- wiki.ubuntuusers.de/SSH#Authentifizierung-ueber-Public-Keys
- forum.ubuntuusers.de/topic/my-book-live-ssh-zugang-verweigert-passwordaut/#post-3164352
- www.freebsd.org/doc/de_DE.ISO8859-1/books/handbook/openssh.html
Vorraussetzung der Zugriff über ssh und Passwort funktioniert bereits.
Auf meinem Rechner den Public Key erstellen:
$ ssh-keygen -t rsa den Public Key für rootauf WD My Book Live übertragen:
$ ssh-copy-id -i ~/.ssh/id_rsa.pub root@mybooklive.local
root@mybooklive.local's password: welc0me
Now try logging into the machine, with "ssh 'root@mybooklive.local'", and check in:

  ~/.ssh/authorized_keys

to make sure we haven't added extra keys that you weren't expecting.
und siehe da man kann sich ohne Passwort als root auf dem WD My Book Live anmelden:
$ ssh root@mybooklive.local Damit ich nicht als root auf das Gerät zugreifen muss, erlaube ich dem Standard-Nutzer admin auch den Zugriff über ssh.
Dazu muss der Public Key auch dem Nutzer admin zugeordnet werden. Dazu werden die Dateien des Verzeichnisse /root.ssh in das Verzeichnis /share/.ssh kopiert
MyBookLive:~# mkdir /shares/.ssh
MyBookLive:~# cp ~/.ssh/* /shares/.ssh/.
MyBookLive:~# ls -l /shares/.ssh/
total 128
-rw------- 1 root root 391 2012-03-01 11:31 authorized_keys
-rw-r--r-- 1 root root 442 2012-03-01 11:31 known_hosts
MyBookLive:~# chmod +r /shares/.ssh/authorized_keys
MyBookLive:~# ls -l /shares/.ssh/
total 128
-rw-r--r-- 1 root root 391 2012-03-01 11:31 authorized_keys
-rw-r--r-- 1 root root 442 2012-03-01 11:31 known_hosts
MyBookLive:~# exit
und siehe da man kann sich ohne Passwort als admin auf dem WD My Book Live anmelden:
$ ssh admin@mybooklive.local
Linux MyBookLive 2.6.32.11-svn21605 #1 Fri Oct 15 17:13:23 PDT 2010 ppc
Last login: Thu Mar  1 13:09:26 2012 from 192.168.1.8
admin@MyBookLive:~$ ssh Zugriff auf WD My Book Live
28.02.2012 - Lesezeit: 3 Minuten
Um den ssh Zugriff zu ermöglichen kann man diese Hinweise befolgen:
Einloggen unter:
http://mybooklive.local/UI/login
Dann auf die ssh-Seite wechseln:
http://mybooklive.local/UI/ssh
Um den ssh Zugriff zu ermöglichen kann man diese Hinweise befolgen:
http://community.wdc.com/t5/My-Book-Live/Telnet-or-ssh-my-book-live/td-p/87065
-
Konfigurationsdatei über mybooklive.local herunterladen
- Einstellungen
- Dienstprogramme
- Aktuelle Konfiguration importieren/exportieren
-
Die heruntergeladene Datei bearbeiten
ssh_enable="disabled"ändern in
ssh_enable="enabled" -
und wieder hochladen. Danach führt MyBookLive einen Neustart aus.
-
Jetzt ist ein Zugriff als root über ssh möglich:
$ ssh root@mybooklive.local
root@mybooklive.local's password: welc0me
MyBookLive:~# df -h
Filesystem          Size  Used Avail Use% Mounted on
/dev/md1            1,9G  887M  939M  49% /
tmpfs                50M     0   50M   0% /lib/init/rw
udev                 10M  6,5M  3,5M  65% /dev
tmpfs                50M     0   50M   0% /dev/shm
tmpfs                50M  2,5M   48M   5% /tmp
ramlog-tmpfs         20M  2,2M   18M  11% /var/log
/dev/sda4           1,9T  260G  1,6T  15% /DataVolume
MyBookLive:~#
Damit ich nicht als root auf das Gerät zugreifen muss, erlaube ich dem Standard-Nutzer admin auch den Zugriff über ssh.
Dazu wird mit dem Editor nano die Datei /etc/ssh/sshd_config bearbeitet. (Bitte beachten: es gibt auch eine Datei “/etc/ssh/ssh_config”. Diese ist hier nicht gemeint.)
MyBookLive:~#nano /etc/ssh/sshd_config Die Zeile
AllowUsers root erweitern auf
AllowUsers root admin und den ssh-Server anweisen die Konfiguration neu zu lesen:
MyBookLive:~#/etc/init.d/ssh reload $ ssh admin@mybooklive.local
admin@mybooklive.local's password:
Linux MyBookLive 2.6.32.11-svn21605 #1 Fri Oct 15 17:13:23 PDT 2010 ppc
Last login: Thu Mar 1 12:59:41 2012 from 192.168.1.8
admin@MyBookLive:~$ df -h
Filesystem Size Used Avail Use% Mounted on
/dev/md1 1,9G 887M 939M 49% /
tmpfs 50M 0 50M 0% /lib/init/rw
udev 10M 6,5M 3,5M 65% /dev
tmpfs 50M 0 50M 0% /dev/shm
tmpfs 50M 2,5M 48M 5% /tmp
ramlog-tmpfs 20M 2,3M 18M 12% /var/log
/dev/sda4 1,9T 150G 1,7T 9% /DataVolume
admin@MyBookLive:~$ pwd
/shares
admin@MyBookLive:~$